Quick Start
If all you want to do is get going with the system by getting your own items up and running in the shop, replace the ship mesh, and the station mesh then start here. This will also show you how to replace the included pawn with one of your own and transfer the logic over if you so desire.
If all you want to do is get started creating your own items than skip ahead to that section.
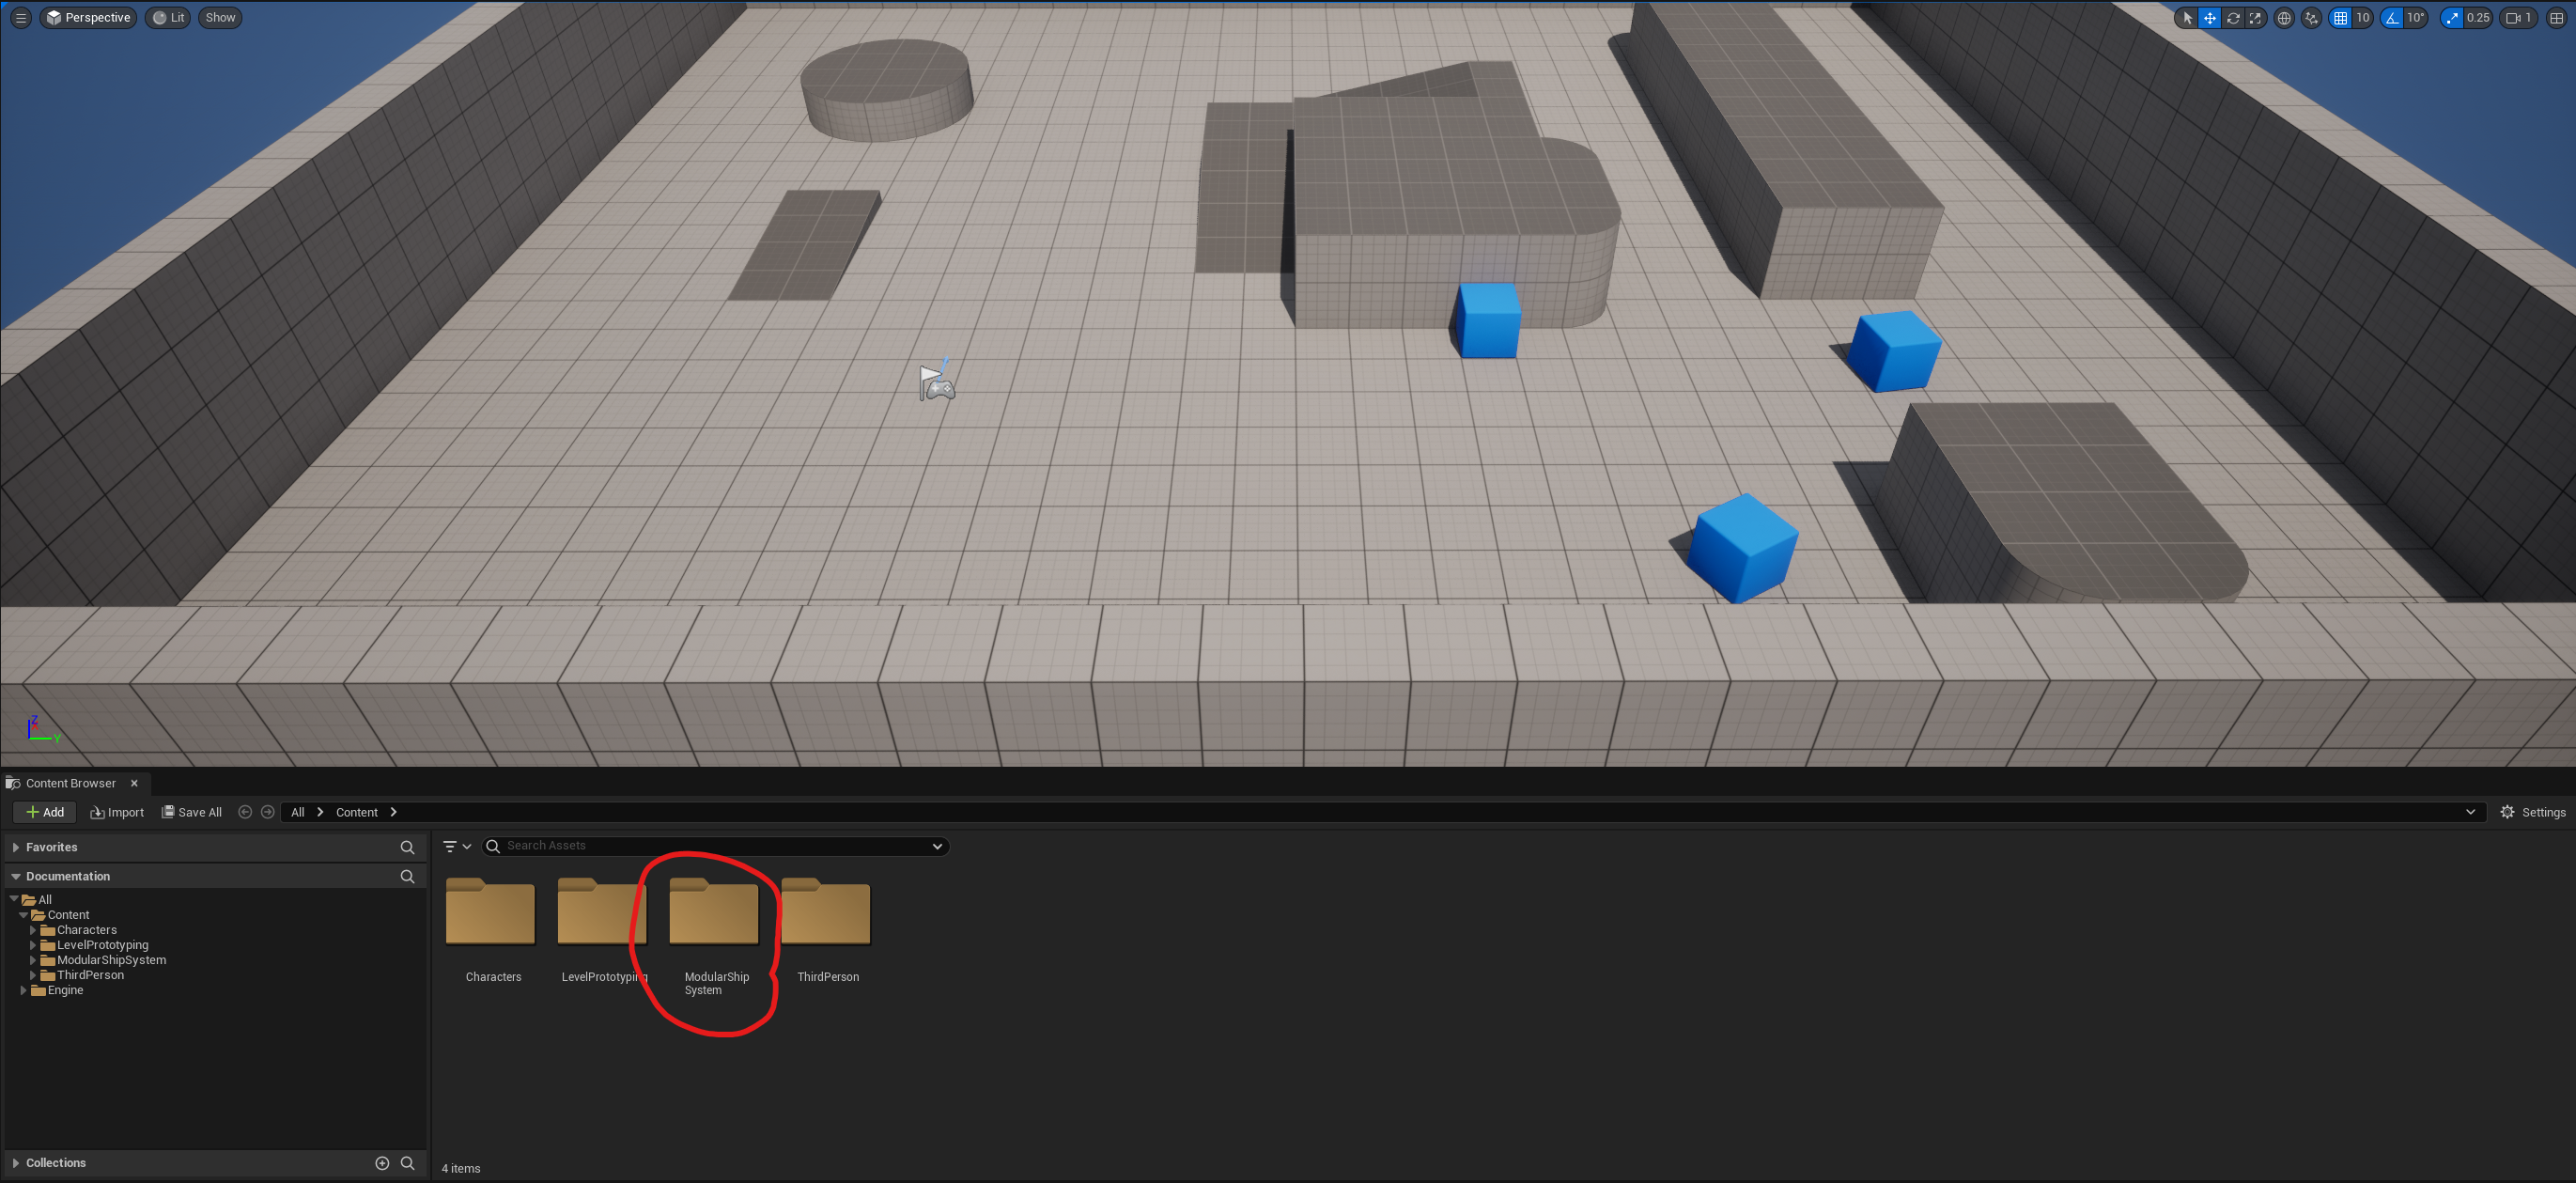
I'll be using the included demoMap as a starting point, found in the demo/Maps folder. Once you have added MSSS to your existing project, there will be a folder containing all the assets you need to get started.
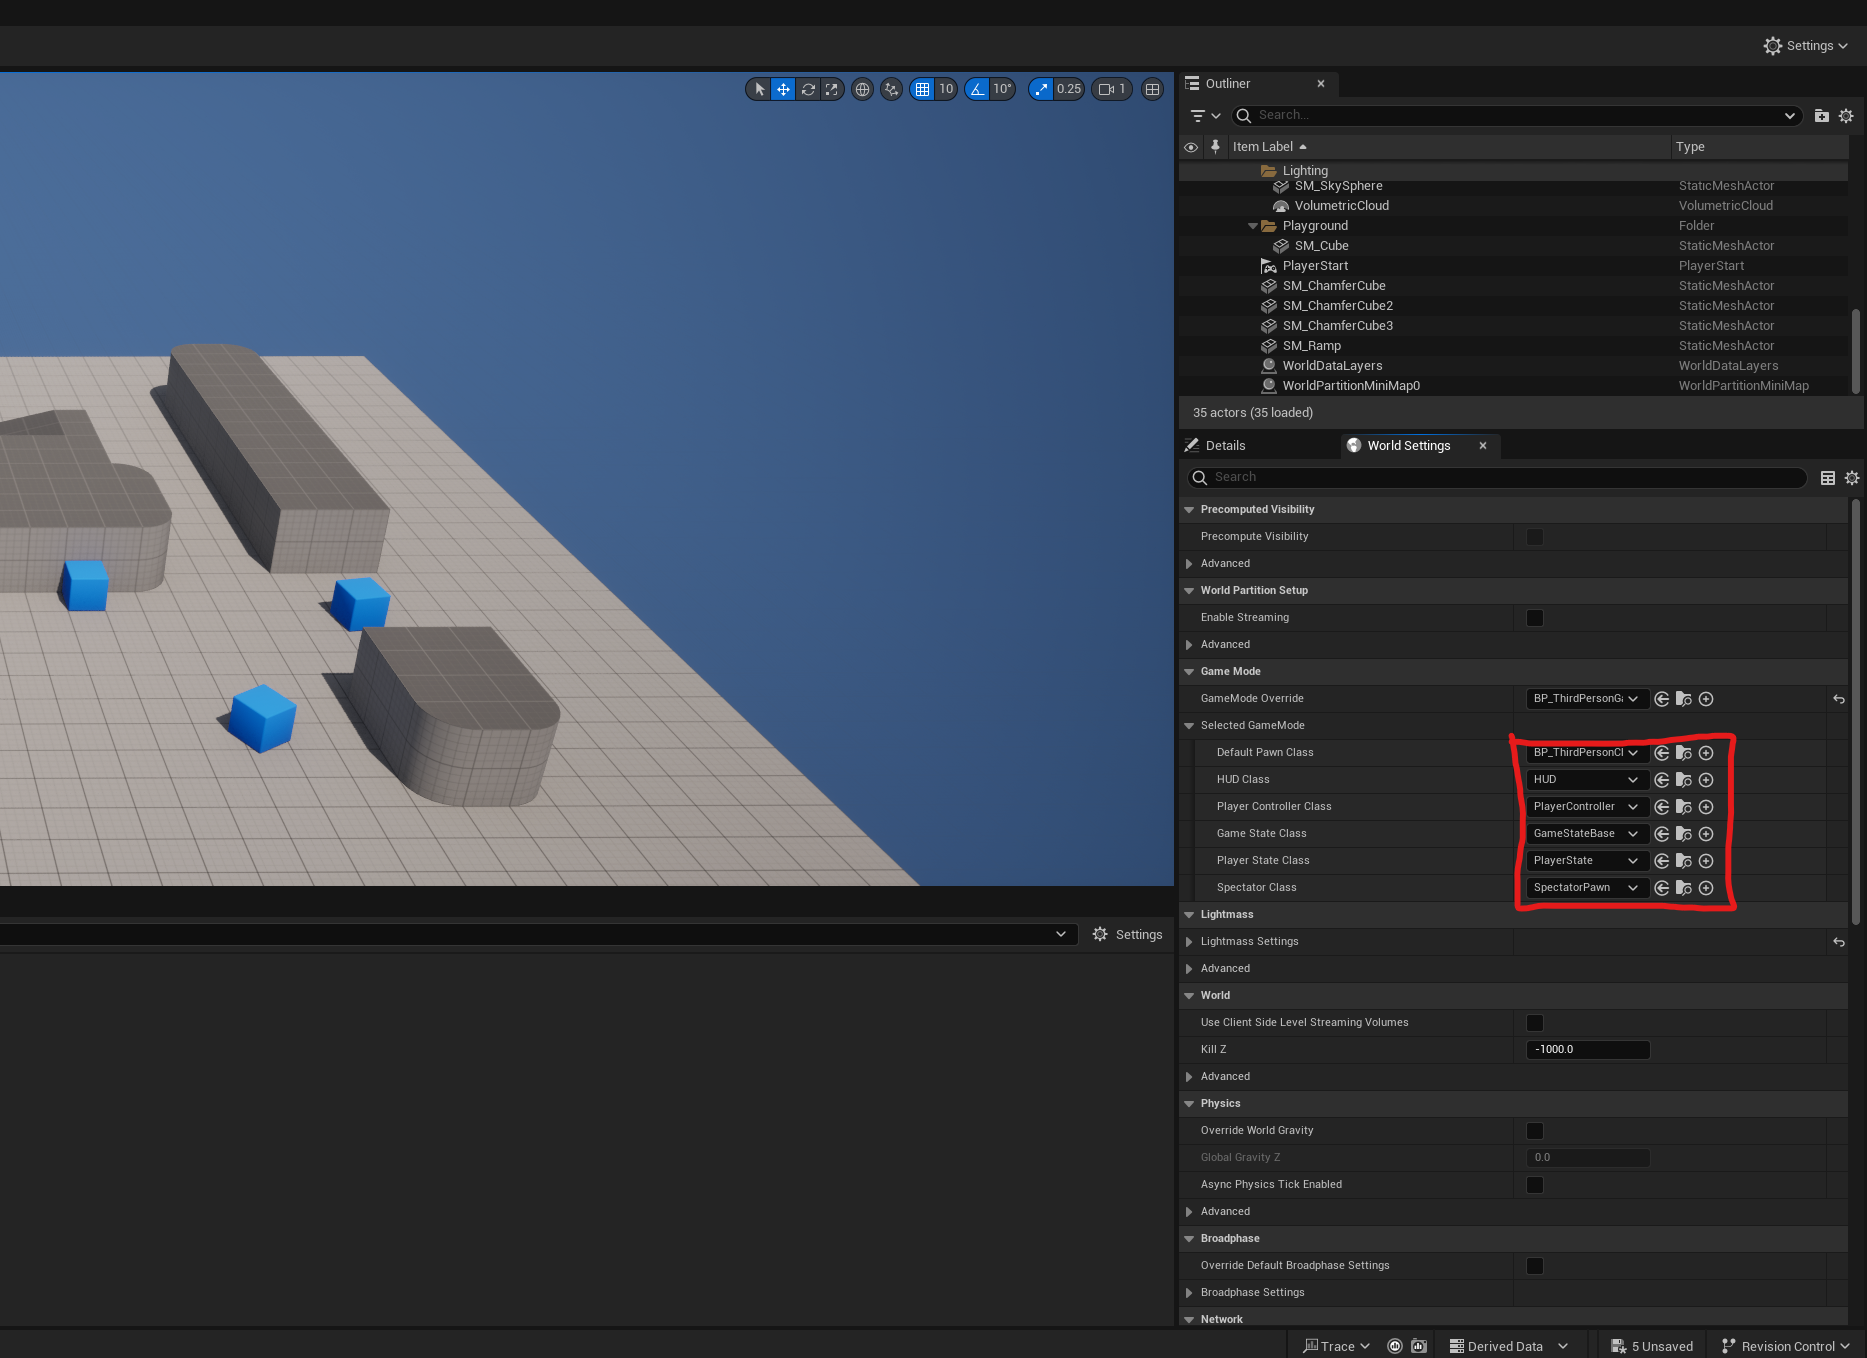
If all you want to do is use the included pawn and station, all you have to do is open the world settings and change the default pawn and default HUD class.
The included HUD Class BP_ShipHUD contains a lot of the logic for managing shop UI windows but the logic can easily be copy and pasted over to your existing HUD class if you have one. It's Event Begin Play simply creates a bunch of widgets for the shop and outfitting UI and stores references to them as variables to later call to display and close appropriate UI elements. If you wish to change the process to only create them when necessary rather than begin play it should be straightforward enough.
Replacing The Included Pawn Mesh
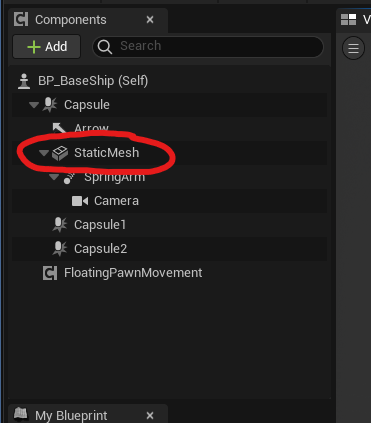
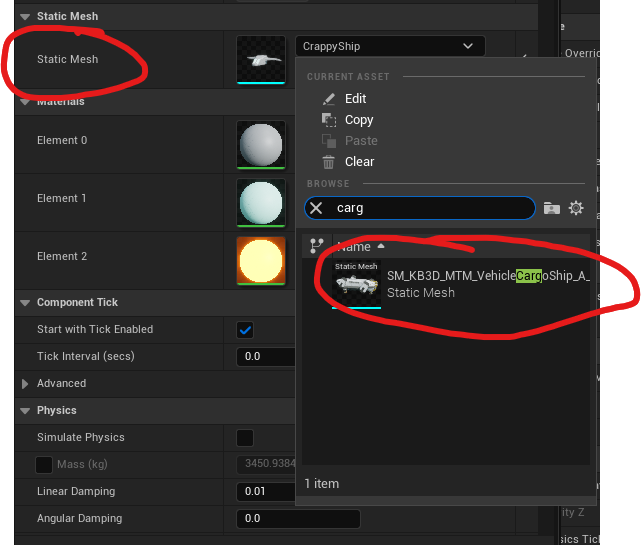
If the included arcade-y style pawn controls are to your liking and simply wish to change the mesh than head over to the MSSS folder under Demo/Pawns and open BP_BaseShip, or create a duplicate of it and open that if you wish to keep the original unchanged. With that blueprint open head to the viewport view and select the StaticMesh component on the left list. Then on the right, select the Static Mesh dropdown and select your static mesh. For this documentation I am using a free space ship from Kitbash3D and their Mission to Minerva pack, available in their Cargo application. Once your mesh is selected, adjust its rotation and and scale accordingly. When you are happy with the results, open your ship static mesh.
Setting up mesh sockets
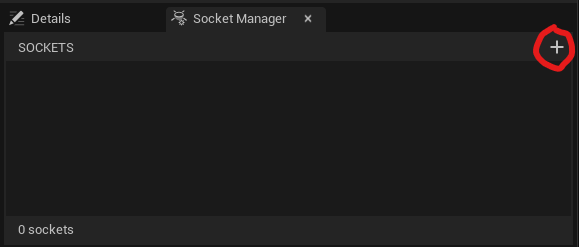
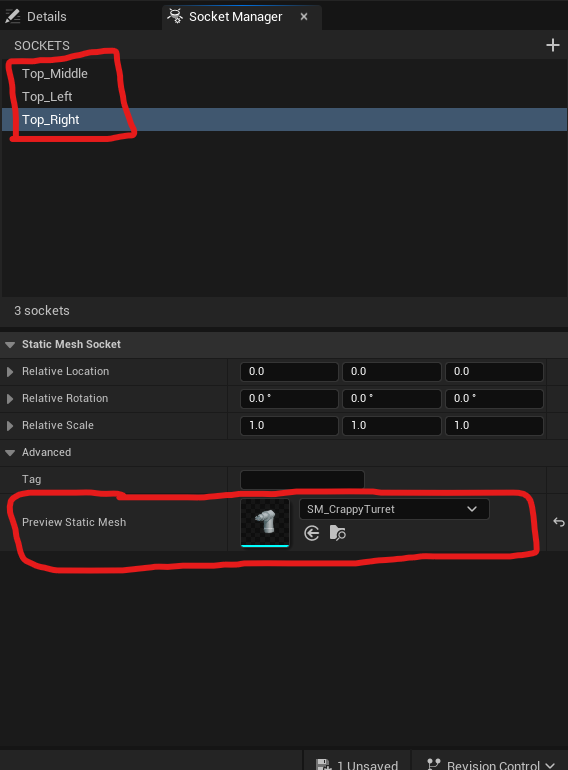
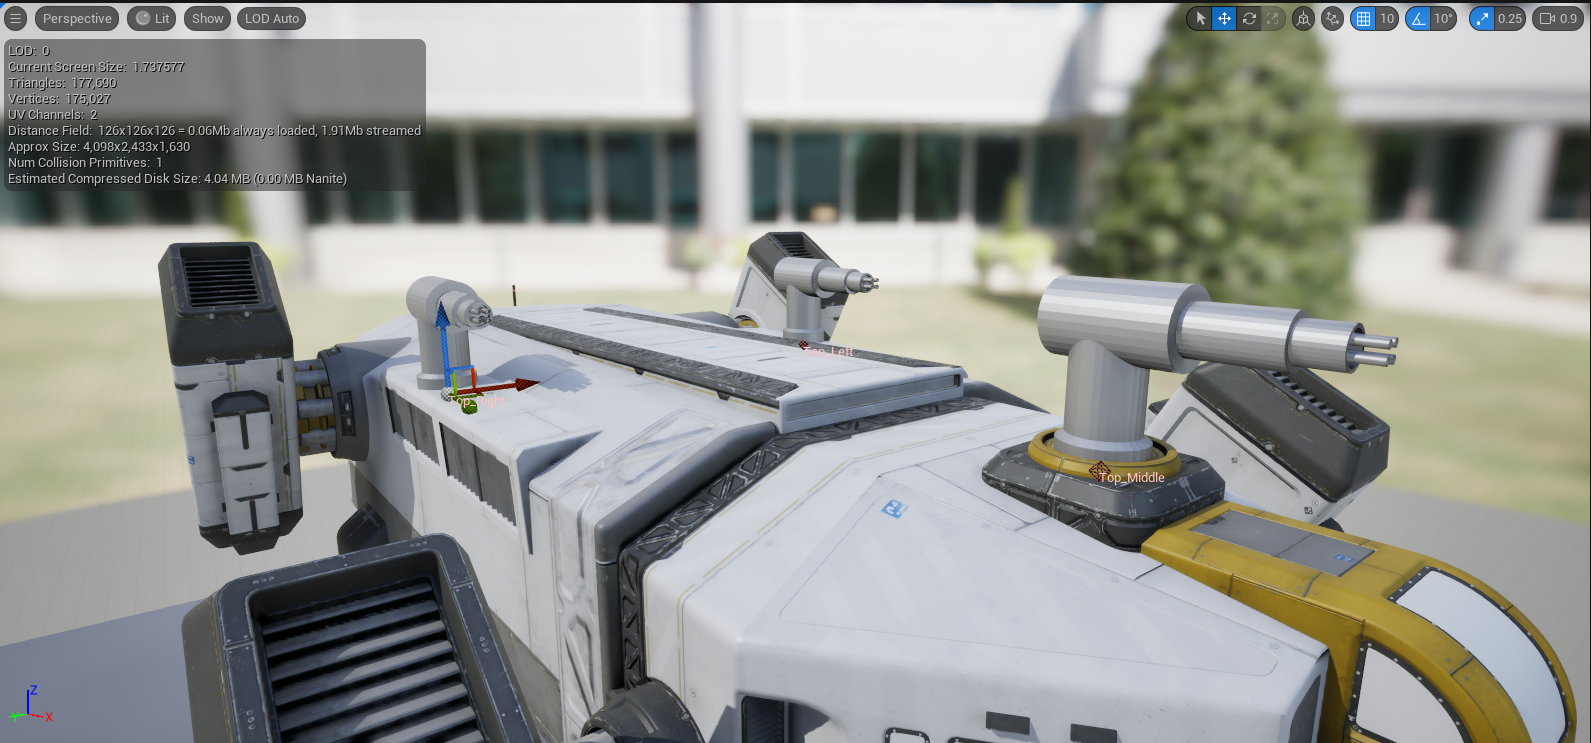
In this step you need to setup sockets for hardpoints/weapons to attach to. So open the Socket Manager window in the static mesh editor and create, move and rename your sockets to where and how you want them named. You can use the Preview Mesh option to assign a mesh to preview how that mesh will look when equipped to that socket. The included SM_CrappyTurret can be used if you don't have a weapon/hardpoint mesh in your project yet. If needed, adjust the sockets relative scale as well if your hardpoint or weapon is not the correct scale in relation to your ship mesh.
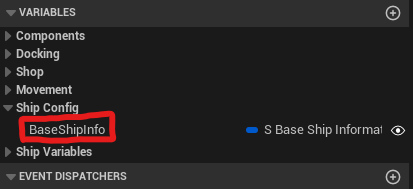
Once all your sockets are in the correct location on your mesh and have been named, head back to BP_BaseShip and look on the variables list. Under Ship Config click on the variable BaseShipInfo.
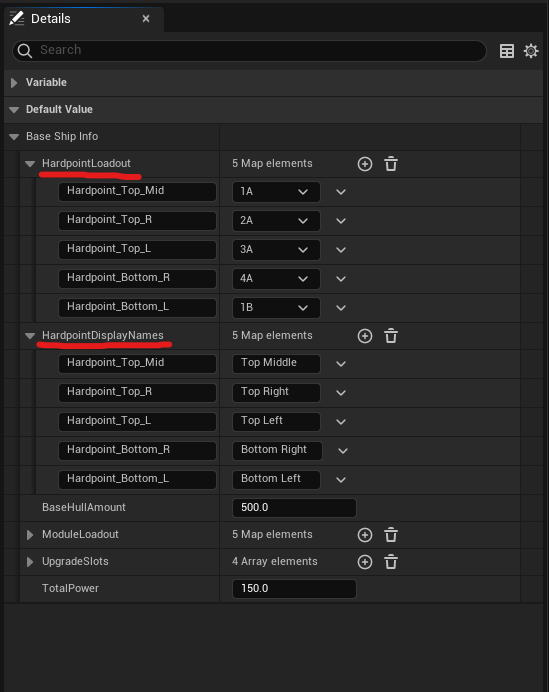
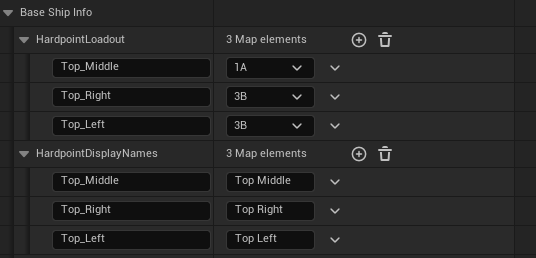
Under the Details window, typically on the right of the screen, there is a Default Value section expand the variables default values and expand the HardpointLoadout and HardpointDisplayNames section. Click the little trash can icon on each to reset the Maps to have no entries, then proceed to add new entries. The HardpointLoadout map defines your sockets and the maximum allowed class in that slot. The HardpointDisplayNames map simply finds each socket and assigns a display name for in the shop for that socket. So in each HardpointLoadout and HardpointDisplayNames input your socket names exactly as you named them and assign the appropriate max class and display name for each socket.
Once that is finished, that is it! You now have custom attach locations for hardpoints and weapons on your custom ship mesh. If you want to move the logic over to a different pawn rather than using the included one, check out the Replacing Pawn section of the documentation.
Replacing Included Station Mesh
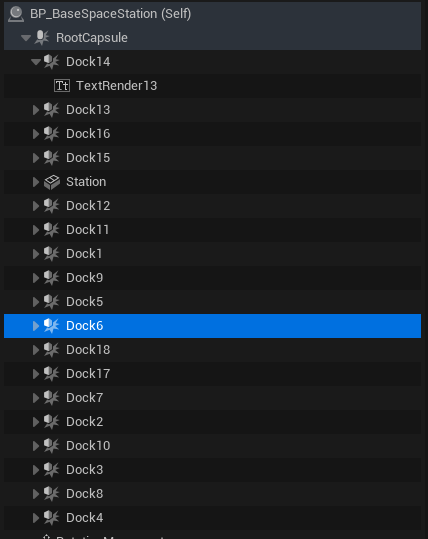
Under ModularShipSystem/Demo/Blueprints you will find the blueprint BP_BaseSpaceStation. The process for the space station is almost identical to the space ship. Swap the static mesh, scale it correctly and then select all of the box collision boxes and move and scale them to their appropriate landing pads on your station mesh.
You will notice that each of the box collisions has a text renderer attached. In the demo this is simply the dock number used to show the player what dock they are docking at. These can easily be removed as well as the ones attached to the station mesh, which are used just for the station name. You can repurpose them if you want.
Next, open the static mesh you are using for the station and open the socket manager. Repeat the same process you did for the ship. IMPORTANT!!! - The sockets on your station static mesh need to match the names of the box collision they are assigned to. For example if a station has 16 docking locations, each box collision is used to tell when the player overlaps an area in which they can initiate docking and tells the player which box collision they are overlapping with and which socket that box collision will have them dock at.
So if your station has 16 landing pads, it needs 16 sockets and 16 box collisions, one for each landing pad. The names of the box collisions and the sockets need to match. So for landing pad 1 the socket name in the demo files is Dock1 and the matching box collision is Dock1. This way the system knows, when the player overlaps with Dock1 Box Collision and docks, they should dock at Dock1 socket on the station mesh.
This is the only real difference between changing the mesh on the ship and the station.
Aside from that, once your sockets are named and positioned, the box collisions are named and positioned, and any text renderers are named and position, switch over to the Event Graph of the BP_BaseSpaceStation.
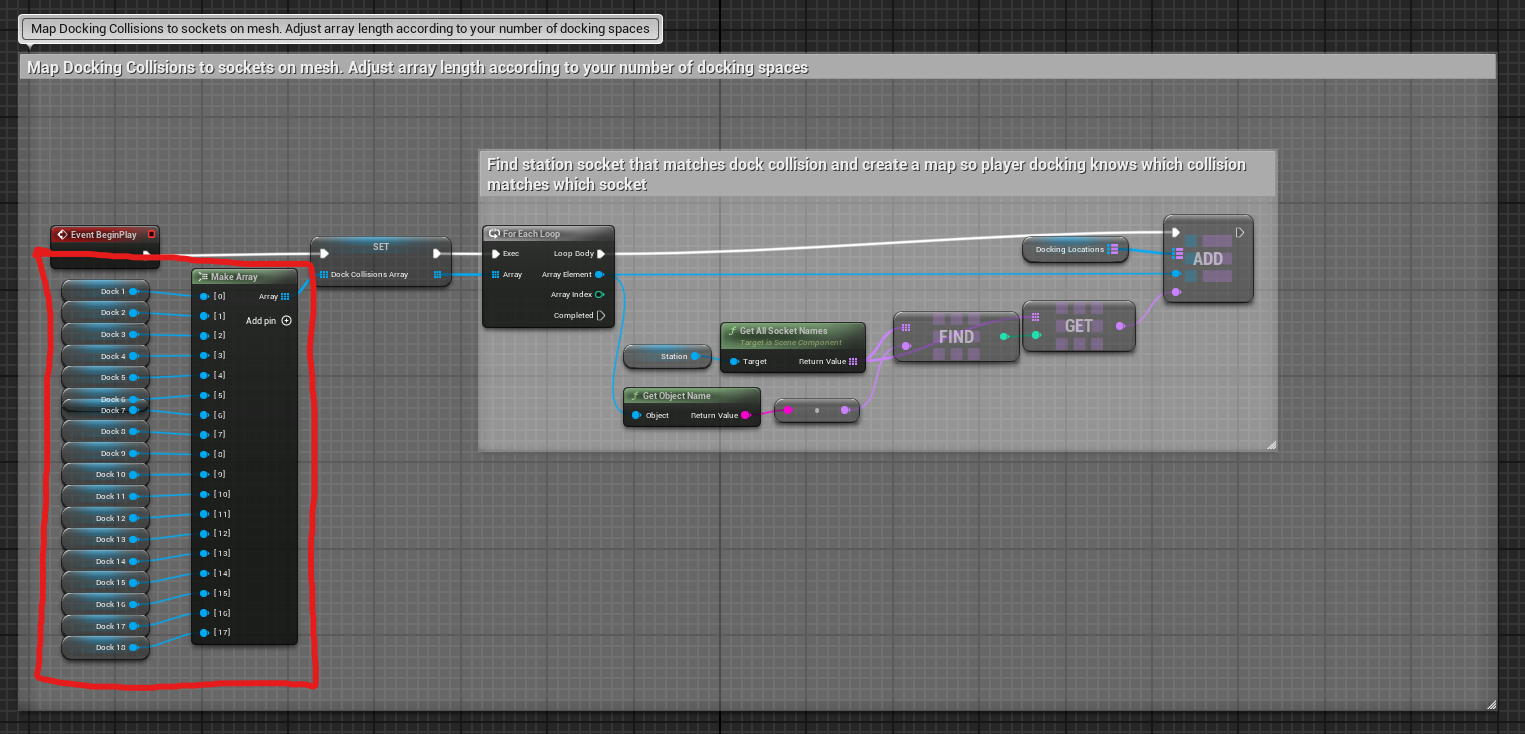
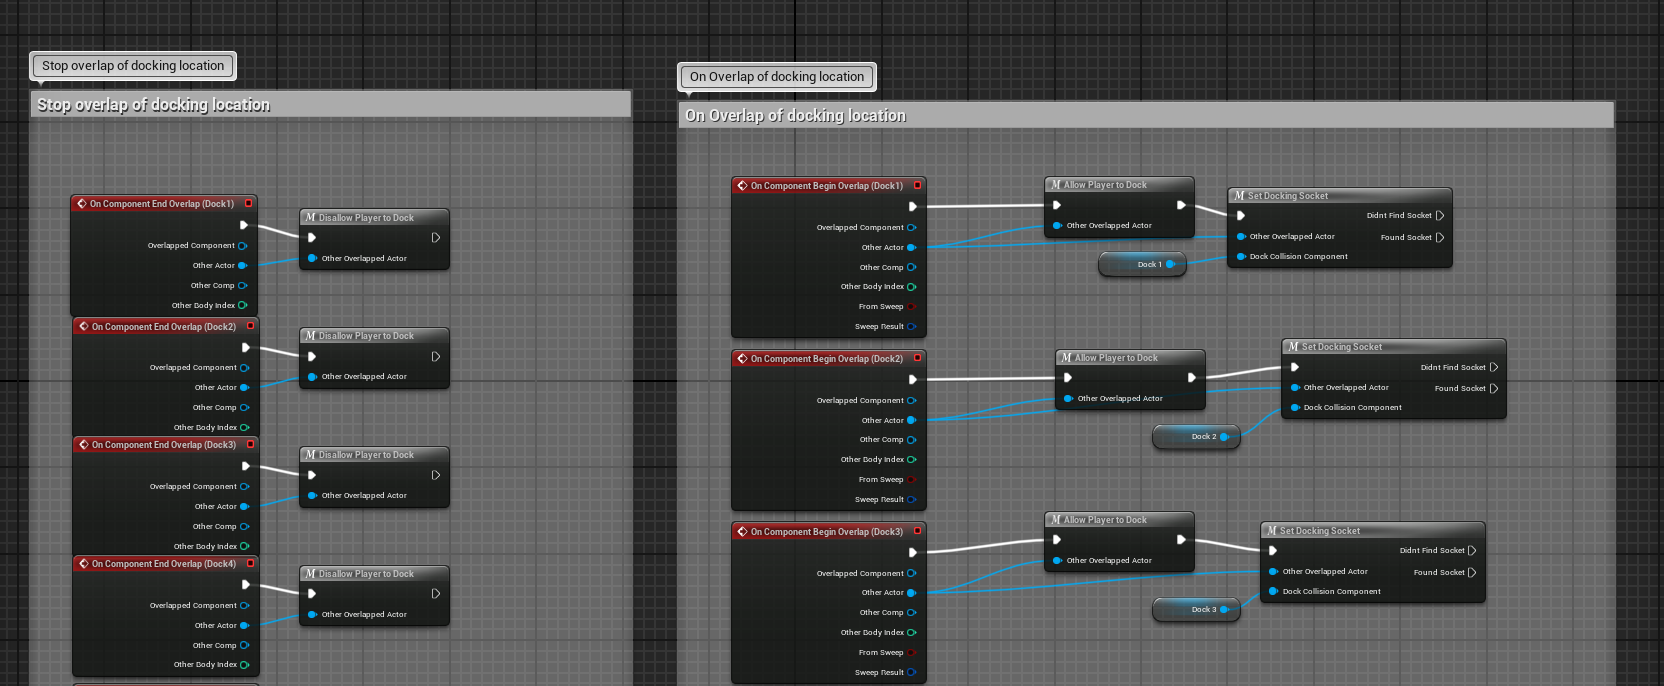
In the top commented section of blueprints you will find the logic for mapping docking collisions to their corresponding socket locations. Just make sure a reference of each of your docking box collisions is added to the Make Array node. There are 18 by default with the demo files. If you remove some of the docking collisions for a smaller station, delete those box collisions and remove their references from the Make Array node. If you add more simply right click the Make Array node and click on Add Pin. Then click and drag on your new box collision on the left list of components and drag it onto the new pin you just created on the Make Array node.
The last thing to do is just register the On Begin/On End Overlap events for your box collisions. By default, the 18 that come with the station are already done. So unless you added or removed box collisions you can skip this. If you added/removed box collisions do the following.
If you removed some of the box collisions that came with the kit, simply delete their corresponding On Component Begin/End Overlap events from the Event Graph
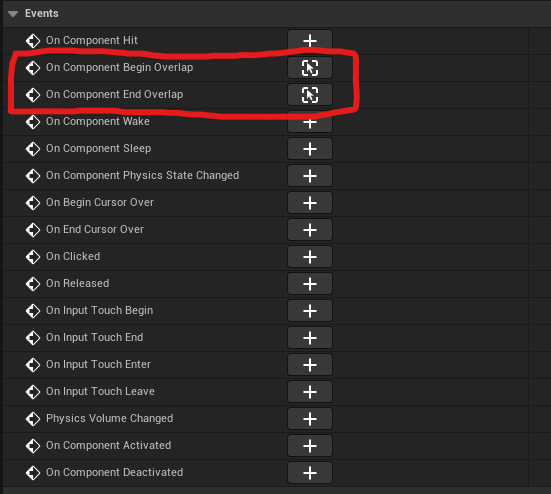
If you added new box collisions (and have ensured they are named to corresponding with their correct docking socket on the station mesh), then click on the newly added component in the list on the left. On the right Details menu, clear down at the bottom, there are events. Click on the On Component Begin Overlap and the On Component End Overlap events to get event nodes for that box collision that will trigger when the player begins and stops overlapping it.
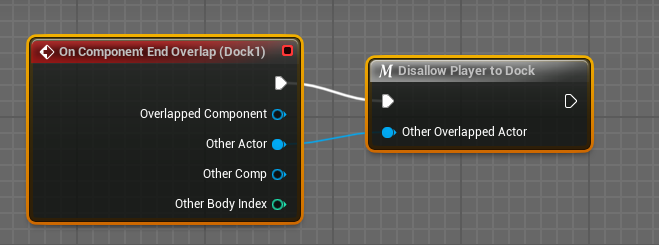
On the left of the Event Graph is the End Overlap events. Place your newly created event there and copy and paste the Disallow Player to Dock Macro node or drag it onto the event graph from the list of macros on the left. From the event node you created, drag from the Other Actor pin and connect it to the input pin Other Overlapping Actor on the macro node. Then connect the execution pins.
Now for the Begin Overlap event you created for your new box collision, copy and paste (or drag from the macro list) the Allow Player to Dock and the Set Docking Socket macros. Connect the Other Actor pin from your event node to the Other Overlapped Actor input pins on the two macro nodes, then drag a reference (like you did for the Make Array node above) into the event graph and connect it to the input pin Dock Collision Component on the Set Docking Node
That is it! You should now have your custom station mesh in the blueprint as well as correct docking!
Creating Your Own Items
Do get started creating your own items using the included categories and stats, head to Demo/DataTables under there you will find the directory WatchtowerStation_Shop and in that folder is all the data tables used to define the demo stations shop lists. A stations shop lists contains all the categories of items it sells as well as the specific items in those categories. As well as those items stats or stat modifications.
So for the quick start guide I will show you how to add items to the existing shop lists and categories for Watchtower Station, the included station.
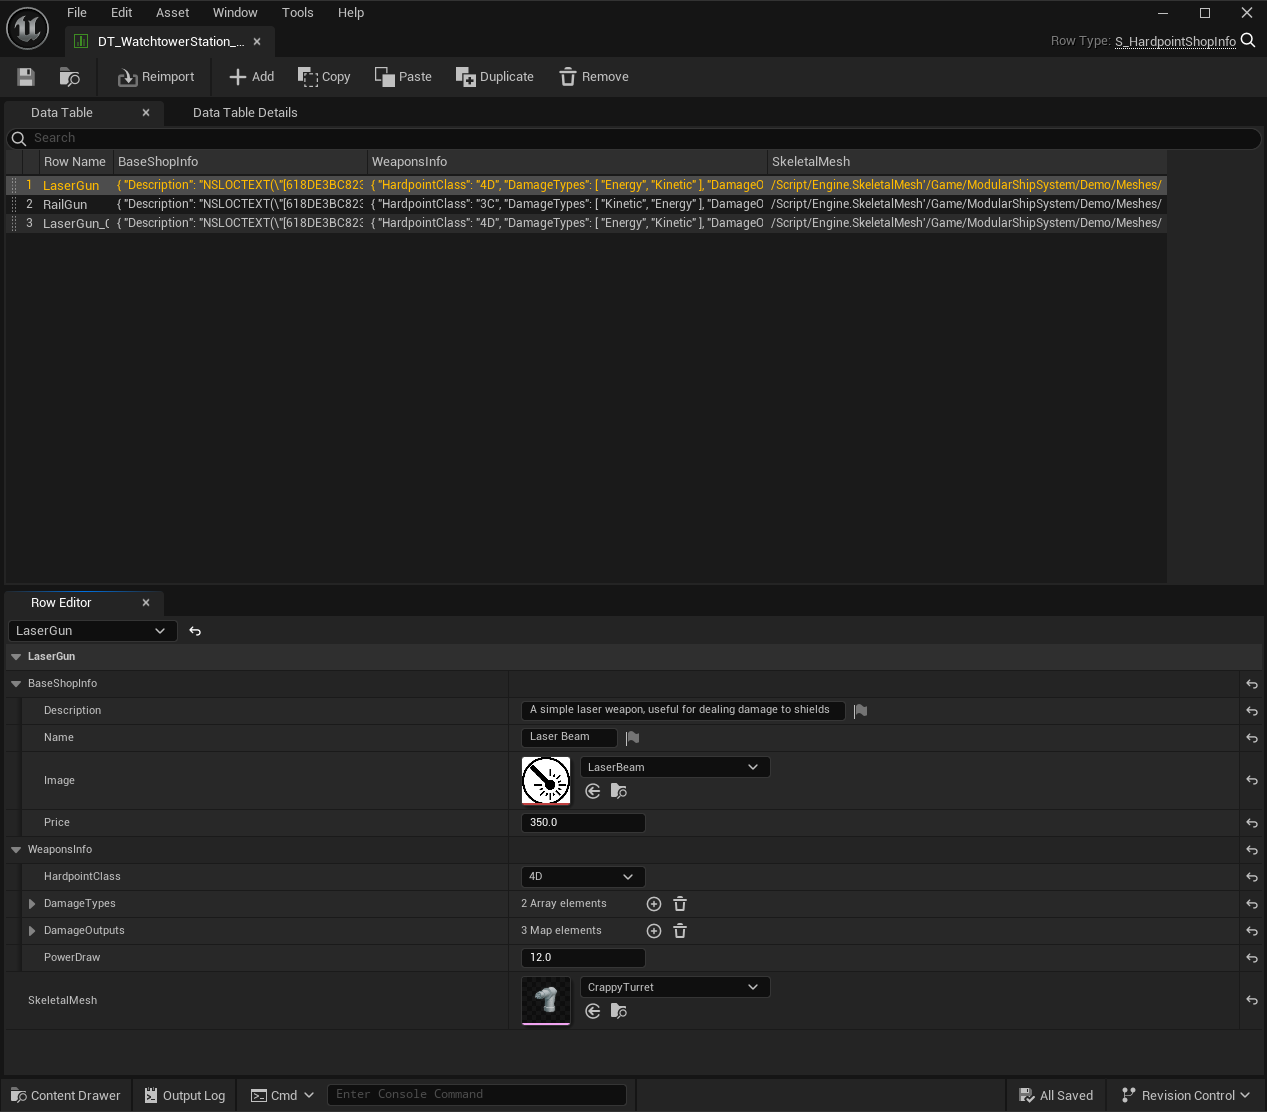
Go into the WatchtowerStation_Shop folder and open the DT_WatchtowerStation_Hardpoints data table.
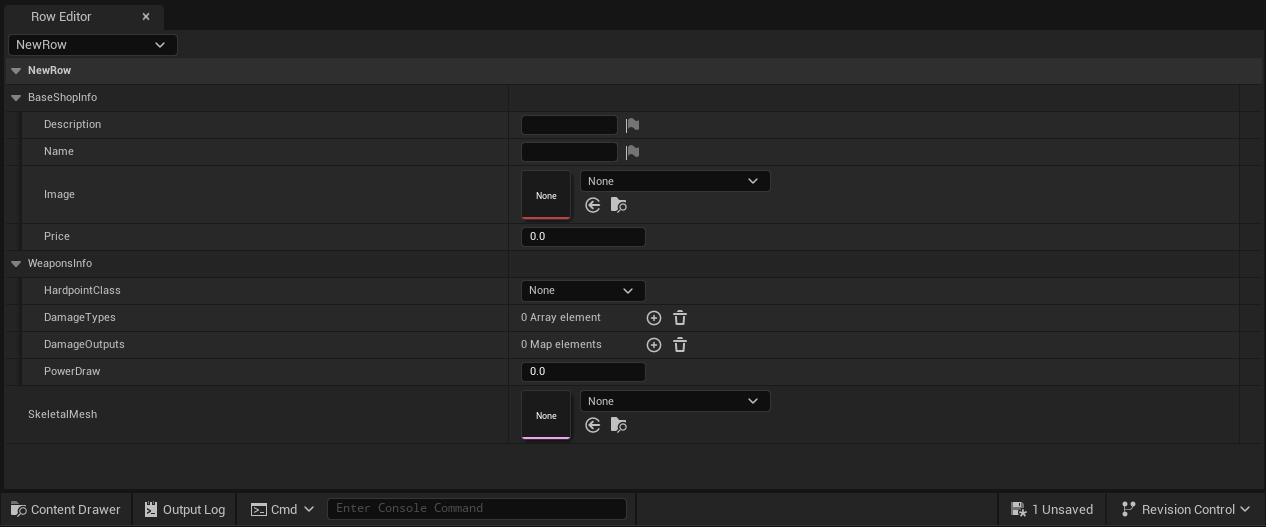
This is the data table for the stations hardpoints, or weapons, that it stocks and sells. To create a new item simply press the Add button at the top of the window and a new row will be created in the data table. On the bottom half of the window you will find all the necessary information needed to create your item!
Double click the Row Name of your new row in the top half to give it a unique row name. This is simply used by the data table to tell which row is which, not important to you or the player really. Now in the Row Editor in the bottom half of the screen begin filling out the information for your new weapon. Specifics on each variable can be found further in the documentation but here is a brief rundown of each.
- Base Shop Info - This is a struct that sets all the information for the shop UI to create information to display to the player when purchasing an item
-
Description - The description of your item as it appears in the store to the player -
Name - The name of your item in the shop -
Image - The icon of your item in the shop -
Price - The price the player pays to purchase your item from the shop
- WeaponsInfo - This is the struct that sets all of the info for the weapon itself and these stats will then in-turn be passed onto the the player if they purchase and equip this item
-
HardpointClass - The module class of this hardpoint/weapon -
DamageTypes - The type of damage dealt by this weapon. Included damage types out of the box are *Kinetic, Energy, and EMP* -
DamageOutputs - For each of the damage types you add, add the corresponding damage done by that damage type here -
PowerDraw - The amount of power drawn by this hardpoint/weapon from the ships *Total Power*
- SkeletalMesh - This defines what skeletal mesh to equip to the player ship when they purchase and equip the item.
Once you have all those filled out you should be able to see your new item in the shop! The process is the same for each category. Just find that categories data table and add an item to it. The shop will adapt to its assigned data table. If you are on the demo map, the station in that map already uses the data tables we edited, so your items should show up in the shop. If you are using a different level, you simply need to drag the spacestation blueprint into your level, and then with it selected in the level, on the right under Details find the Station Config section and under there expand the Station Shop List and assign the corresponding data tables. Note, the ModulesCategoriesShopList and UpgradesCategoriesShopList use a parent data table to list the categories and store the sub data table that holds all the actual shop info for those categories. This is covered in depth later when going over specifics on the space station blueprint.
If you want to assign different categories of items, different data tables to specific stations and so on. Read further on in the documentation but this page should give you a basic Quick Start on using the system.
